


How to Build a Home Gym in a Small Garage
Table of Contents
- Step 1: Measure Your Space and Set a Budget
- Step 2: Choose Space-Saving Home Gym Equipment
- Step 3: Pick the Right Garage Gym Flooring Options
- Step 4: How to Climate Control a Garage Gym
- Step 5: Plan Lighting, Mirrors, and Storage
- Step 6: Address Safety, Noise, and Structural Limits
- Choosing Equipment That Fits Your Training Goals
- Conclusion
- Frequently Asked Questions
Last Updated: September 8, 2026
Building a home gym in a small garage fails for one reason more than any other: buying equipment before you understand your physical constraints. The process is a series of engineering decisions about floor space, ceiling height, and structural load, not a shopping spree.
A small garage gym is any training space under roughly 250 square feet where every square inch must earn its keep, and planning for a small garage gym starts with those exact dimensions. Planning for vertical storage, foldable equipment, and multi-functional units before you spend a dollar separates a setup you use from one that collects dust.
Step 1: Measure Your Space and Set a Budget
Start with the dimensions that dictate your equipment choices: floor footprint, usable wall space, and ceiling height. Measure the clear floor area after accounting for garage door tracks, water heaters, and shelving, because those obstructions shrink your training zone more than the raw square footage suggests.
A power rack requires roughly 8 feet of depth when loaded, but a foldable rack needs only a few inches of wall depth when stored. Ceiling height matters most for overhead presses and pull-ups, so measure from the finished floor to the lowest obstruction. Set your budget before you fall in love with a specific machine, allocating about two-thirds to core strength equipment and the rest to flooring, lighting, and climate control.

Step 2: Choose Space-Saving Home Gym Equipment
The best space-saving home gym equipment consolidates multiple movements into one footprint rather than adding single-purpose machines. For a small garage, prioritize a multi-functional unit that combines a power rack, Smith machine, and functional trainer, replacing three separate pieces of equipment with one station.
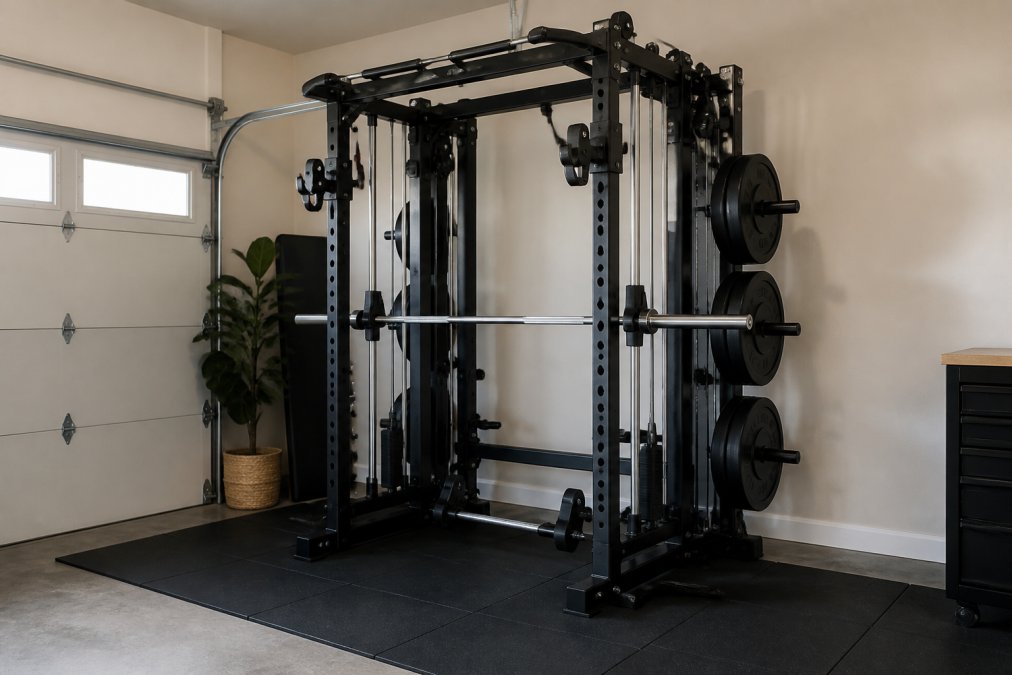
Look for equipment with integrated weight storage, which keeps plates off the floor and reduces the footprint you need for loading and unloading. A commercial squat rack with built-in plate storage serves the same purpose for lifters who prefer free weights. Wall-mounted and foldable options are the right call when you need to park a car in the same garage, returning the space to full use in minutes.

For cardio, a folding treadmill with auto incline stores vertically or slides under a bench when not in use. The key is choosing gear that supports your specific training style, rather than buying a little of everything.
Step 3: Pick the Right Garage Gym Flooring Options
Garage gym flooring options are not just about protecting the concrete; they are about creating a stable, safe training surface. The two primary functions, impact protection and equipment stability, require different solutions, and choosing the wrong one can lead to equipment wobble, cracked slabs, or even injury.
The Structural Reality of Your Garage Floor
Before you buy a single mat, assess the structural integrity of your garage slab. A standard 4-inch residential concrete slab is typically rated for a live load of 40 to 50 pounds per square foot (psf) (codes.iccsafe.org). A power rack with a loaded barbell, a set of plates, and a lifter can easily concentrate over 1,000 pounds onto a small footprint. While the slab's overall capacity is usually sufficient, the point load under a rack's feet or a dropped barbell can exceed the concrete's tensile strength, leading to hairline cracks or spalling.
Actionable steps before installing flooring:
- Inspect for existing damage: Look for cracks wider than 1/8 inch, signs of settling, or areas where the concrete is crumbling. These indicate structural issues that need professional evaluation.
- Check the slab's thickness: If you have access to a basement or an unfinished area, measure the slab's thickness. A slab thinner than 3.5 inches may require a structural engineer's assessment for heavy deadlifting.
- Seal the concrete: Before laying any flooring, apply a high-quality concrete sealer. This prevents moisture from wicking up through the slab, which can cause rubber mats to mildew and metal equipment to rust.
The Layered Approach: Not Just One Type of Flooring
The most effective garage gym floors are not a single material but a layered system designed for specific zones. The 'one-size-fits-all' approach with interlocking mats fails under heavy loads, and a full 3/4-inch rubber floor is overkill for a yoga or mobility area.
Zone 1: The Heavy-Lift Area (Rack, Squat, Deadlift)
This zone requires the most robust solution. The industry standard is a deadlift platform, a sandwich of materials designed to absorb and distribute impact.
- The Core: Start with two layers of 3/4-inch plywood (CDX or better). This creates a rigid, stable base that distributes the load across a wide area, protecting the concrete from point-load impacts.
- The Surface: Top the platform with a 3/4-inch sheet of high-density rubber (often called 'stall mat' or 'cow mat'). This provides a grippy, durable surface for your feet and the barbell.
- The Build: A standard 8' x 8' platform is ideal for a small garage. You can build it in two 4' x 8' halves for easier storage. The center 4' section is the rubber top, with the outer 2' sections on each side being bare plywood for the rack's feet to sit on.
Zone 2: The Equipment and Walkway Area
For the rest of the garage, you need a stable, easy-to-clean surface. The best choice here is 3/8-inch to 1/2-inch rubber rolls. They provide a seamless, professional look and are dense enough to prevent equipment from shifting. They are more difficult to install than tiles but offer superior longevity and stability. Use a heavy-duty double-sided tape or adhesive to secure the edges.
Zone 3: Light-Use and Storage Areas
For areas where you won't be dropping weights or standing for long periods, interlocking foam tiles (at least 1/2-inch thick) are a budget-friendly option. However, they are not durable enough for heavy equipment and can compress permanently under a rack's feet. They are best used for a stretching or cool-down corner.
The Case Against Interlocking Rubber Mats
While popular for their ease of installation, interlocking rubber mats have significant drawbacks for a serious gym: seam separation under lateral stress, instability from thinner and less dense material, and moisture trapping that leads to mold. If you choose interlocking mats, select a high-density 5/8-inch or 3/4-inch version and glue the seams together with a rubber adhesive.
Installation Best Practices
- Acclimation: Let rubber rolls and mats acclimate in the garage for 24-48 hours before installation to prevent buckling or gaps.
- Cutting: Use a sharp utility knife with a straight edge for clean cuts. For curves around posts or door frames, use a jigsaw with a fine-tooth blade.
- Sealing Edges: Seal the perimeter edges with a bead of silicone caulk to prevent dirt from getting under the floor.
By treating your garage floor as a system with distinct zones, you protect your concrete and equipment and create a safer, more professional training environment.
Step 4: How to Climate Control a Garage Gym
Climate control is the difference between training year-round and quitting when summer heat or winter cold makes the garage unbearable. A garage gym needs ventilation for air quality and a heating or cooling source for consistent training temperatures, since most garages are unconditioned spaces.
Start with airflow: a high-velocity fan moves stale air during workouts, while an exhaust fan removes humidity and odors after sessions. For temperature, a mini-split heat pump is the gold standard because it heats and cools efficiently without taking up floor space. Space heaters and portable AC units work on a budget but struggle in extreme weather.
Insulation is the hidden factor that makes climate control affordable. Uninsulated garage doors and walls leak conditioned air constantly, so adding insulation to the door and walls cuts your energy costs and keeps the space closer to your target temperature.
Step 5: Plan Lighting, Mirrors, and Storage
Good lighting in a garage gym serves two purposes: safety and form checking. Overhead LED shop lights provide bright, even illumination that eliminates shadows where you might misjudge a lift, while a wall of mirrors lets you check your squat depth and bar path without filming every set.
Mount mirrors on the wall opposite your rack, not behind it, so you can see your profile during lifts. Use shatterproof acrylic mirrors rather than glass, since a dropped plate or barbell can send shrapnel across the room (the CDC). Vertical storage solutions, including wall-mounted plate trees and dumbbell racks, keep the floor clear.
Acoustics matter more than most guides admit, especially if your garage shares a wall with a bedroom or a neighbor's property. Rubber flooring absorbs some impact noise, but a deadlift platform on top of rubber mats reduces the thud that travels through the slab. If noise is a concern, add acoustic panels to the walls.
Step 6: Address Safety, Noise, and Structural Limits
Safety in a garage gym is not a single checklist item; it is a series of engineering decisions about how your equipment interacts with the building's structure. This section addresses the specific technical challenges of load, noise, and power that most guides ignore.
Structural Load: Beyond 'Is My Floor Okay?'
The primary safety concern is the point load your equipment places on the concrete slab. A 300-pound power rack with 500 pounds of plates and a 250-pound lifter concentrates over 1,000 pounds onto four small feet, each roughly 4x4 inches. This creates a point load of over 60 psi, which can exceed the tensile strength of a standard residential slab, especially if it is older or has hairline cracks.
The Solution: Load Distribution
Your goal is to spread that point load over a larger area. The deadlift platform described in the flooring section is the most effective tool for this. A 3/4-inch plywood base under your rack distributes the weight across its entire footprint, reducing the psi on the concrete to a safe level. For non-platform racks, place a 3/4-inch piece of plywood under the feet.
Wall-Mounted Racks: A Different Structural Challenge
If you choose a wall-mounted or foldable rack, your safety depends entirely on the wall's structure. A standard 2x4 stud wall with 16-inch on-center spacing is often insufficient for a heavy rack. The rack's mounting bracket must be secured to multiple studs with heavy-duty lag bolts (typically 3/8-inch diameter or larger).
Critical checks for wall-mounted racks:
- Stud Finder: Use a high-quality electronic stud finder to locate the exact center of each stud.
- Stud Material: Verify the studs are solid wood, not metal. Metal studs are not designed for this load.
- Bolt Specs: Use the manufacturer's specified bolt size and grade (usually Grade 5 or 8). Do not substitute with standard hardware.
- Shear vs. Pull-out Load: Understand that the rack exerts both a downward shear force and a forward pull-out force. The bolts must be rated for both. Ensure you are using a bolt long enough to penetrate at least 1.5 inches into the solid wood of the stud.
If you are unsure about the wall's ability to handle the load, consult a structural engineer or a professional contractor.
Noise Reduction: The Physics of Sound Transmission
Noise from a garage gym is not just about volume; it is about vibration. The 'thud' of a deadlift travels through the concrete slab into the foundation and then into the house's framing, acting like a drum. Simply adding acoustic foam panels to the walls will not solve this problem.
The Vibration Isolation Strategy:
- Decouple the Platform: Your deadlift platform should not sit directly on the concrete. Place a layer of dense rubber (at least 1/2-inch thick) under the entire platform. This acts as a vibration isolator, absorbing the initial impact and preventing it from transmitting into the slab. This is the single most effective noise reduction measure.
- Address Airborne Noise: The 'clang' of metal plates and the sound of your music are airborne noises. These are best managed by adding mass to the walls. Acoustic panels (like 2-inch thick fiberglass or foam) absorb sound within the room. For blocking sound from leaving the room, you need mass-loaded vinyl or an additional layer of drywall.
- Seal Air Gaps: Sound travels through any gap. Check the perimeter of the garage door for gaps and seal them with weatherstripping. This also helps with climate control.
Electrical Load: Managing Your Power Draw
A garage gym can easily overload a standard 15-amp circuit. A treadmill can draw 15-20 amps on startup, a space heater can draw 12.5 amps, and a mini-split system requires its own dedicated circuit. Running all of these on one circuit is a fire hazard.
Electrical Safety Protocol:
- Identify Your Circuits: Locate your garage's circuit breaker. Determine which outlets are on which circuit. A typical garage has one or two dedicated 15-amp or 20-amp circuits.
- Calculate Your Load: Add up the amperage draw of all equipment you plan to run simultaneously. A good rule of thumb is to never exceed 80% of the circuit's rated capacity (e.g., 12 amps on a 15-amp circuit) (osha.gov).
- The Reality: You will likely need a dedicated circuit for a treadmill or a mini-split. This requires a licensed electrician to run a new line from your main panel. This is a non-negotiable safety upgrade.
- GFCI Protection: All garage outlets must be GFCI-protected per the National Electrical Code. If yours are not, have them replaced immediately.
Smart home integration is a valuable addition, but it must be built on this foundation. A smart plug can control a fan, but it cannot fix an overloaded circuit. A smart speaker can play your music, but it cannot prevent a rack from pulling out of a poorly anchored wall. Prioritize structural and electrical safety first, then add the convenience of smart technology.
Choosing Equipment That Fits Your Training Goals
Your equipment choices should follow your training style, not the other way around. A powerlifter needs a rack, a flat bench, and a deadlift platform, while a general fitness enthusiast benefits more from a functional trainer and adjustable dumbbells.
For lifters who want a commercial-style experience at home, an all-in-one unit that combines a Smith machine, power rack, and functional trainer delivers the most versatility per square foot. Perfected Health Co. offers this configuration with two 220-pound selectorized weight stacks, giving you cable work and guided barbell movements in a single footprint.
The honest trade-off is price. A multi-station unit costs more than a bare rack, but it replaces the need for a separate cable machine and functional trainer, which would consume far more floor space. If your budget is tighter, start with a commercial squat rack with integrated weight storage and add specialty equipment as your training evolves.
Conclusion
Building a home gym in a small garage demands more planning than a spare room conversion because you are fighting climate, concrete, and limited square footage. Measure everything, choose multi-functional equipment, protect the floor, and solve the temperature problem before you commit to a layout. The reward is a training space that eliminates commute time and gym wait, available whenever you are ready to lift.
Perfected Health Co. supports this project with a curated selection of high-performance equipment, from all-in-one Smith machine racks to folding treadmills, engineered for durability and space efficiency. With free shipping on most orders and a 30-day return policy, you can build your setup with confidence rather than guesswork. See the Full Setup and start training at home this week.
Frequently Asked Questions
How much does it cost to build a home gym in a garage?
The cost depends entirely on the equipment you choose. A budget setup with a squat stand, adjustable dumbbells, and a bench can start under $1,000. A commercial-grade all-in-one unit with a Smith machine and functional trainer runs around $3,499. Flooring, lighting, and climate control add a few hundred dollars more. Plan your budget around the few core pieces you will use weekly, not a full catalog of machines.
What is the best flooring for a garage gym?
Rubber flooring is the standard choice for garage gyms. It protects your concrete slab from dropped weights, reduces noise, and provides a stable surface for lifting. Interlocking rubber mats are the easiest DIY option, while rolled rubber flooring (typically 3/8-inch or 1/2-inch thick) offers more seamless coverage. For heavy deadlifts, add a dedicated deadlift platform with a plywood base and rubber top to protect the floor and your equipment.
How do I keep my garage gym warm in winter and cool in summer?
Start by insulating the garage door, walls, and ceiling to stabilize the temperature. A portable space heater or mini-split system handles winter training, while a high-CFM fan or portable AC unit manages summer heat. A dehumidifier is also important in humid climates to protect your equipment from rust. Target a working range between 60 and 75 degrees Fahrenheit for safe, comfortable training year-round.
Is it legal to run a gym out of my garage?
Training yourself in your garage is generally fine, but charging others to train there is different. Most residential zoning codes restrict commercial activity, and you may need a business license, liability insurance, and inspections. Check with your local zoning office before inviting paying clients. If you are only building a personal gym, standard residential building codes still apply to electrical work and structural modifications, so get permits for any major changes.